Double exposure photography is a wonderful way to create a unique portrait of yourself. You’ll need to prepare your scene, adjust camera settings, and post-process the photo to create a seamless double exposure. The following article provides tips and tricks to help you get the best double-exposure shot. Once you’ve mastered these basics, you can start experimenting with double exposures. Hopefully, these tips will help you create an artistic photo of yourself!
Getting a good double exposure
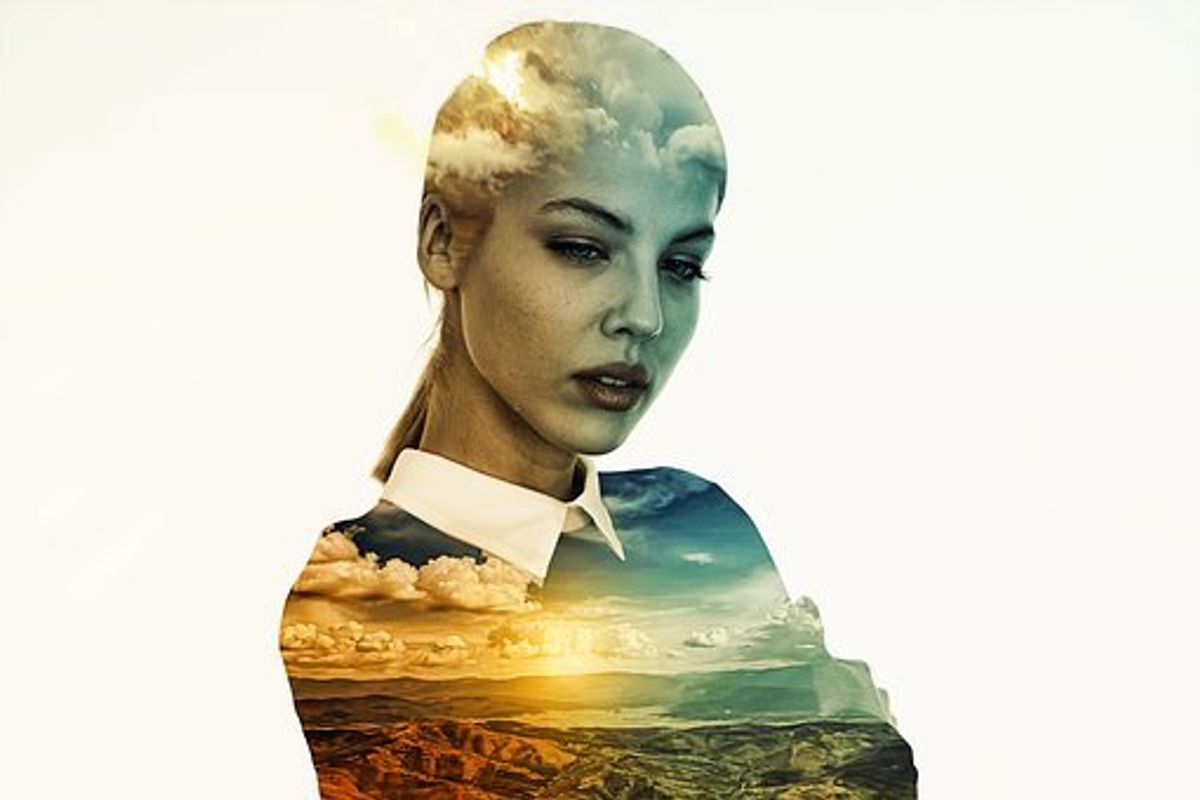
To get a good double exposure in photography, you need two photos of the same subject. The first one should be bright and have details or texture. The second one can be more detailed or abstract, such as a tree, sky, or landscape photo. In Photoshop, you can copy and paste the second image over the first, move it to the same canvas, and change the blending mode to Screen Blending Mode. This will give the photos a look you want.
The next step is to decide which image you’d like to use as an overlay. A recognizable silhouette will work well. A layered image will show texture in the final image. You can also use a neutral background. You can also try taking a photo with the camera on a tripod. The tripod is a major plus when taking a double exposure. In addition to the tripod, you can also use a flash.
To take a double exposure with a digital camera, you will need a camera with a dual exposure mode. Nikon and Canon offer a special double exposure setting on their digital cameras. Once you choose the base image, the camera will take a second exposure on top of it. Adjust the exposure accordingly so the double-exposed shot looks like the first one. A flash will help fill in light and make the double exposure easier. You can also use a shutter release cable to make the process more efficient.
Once you’ve found a good camera, the next step is to choose the right photo to use as a double exposure. You can do this by selecting the first picture from the memory card or taking several similar double-exposure photos on the same roll. This will help ensure that the images you created are as close as possible. The second step is ensuring the lighting is similar in the two photos. Then, you can select the second image from the memory card.
Preparation
To make a double film exposure, you must prepare in advance. This type of photography produces two separate images on one single frame, but you can’t see them until they’ve been processed and scanned. Make sure you’re using a camera that has the double exposure function and has noted a location that will have both bright and dark subjects. Make sure you have all the labeling supplies you need ready as well.
The first step in preparing for double exposure is to choose a subject. A person can make a good double exposure subject if they have a recognizable outline. Then, place a light behind them. Double exposure photography is fun and rewarding when the subjects have a distinct outline. The two images should be related in a portrait or an environment.
The second step is to prepare a base photo. A good base photo should contain a well-lit subject with a neutral background. The main subject should be visible in the base photo. It should also be free of background noise, allowing for even exposure. When you have several photos, you can edit the photos at a later time. A good base photo also includes a subject that’s moving.
Another step in preparing for double exposure is to determine the overall theme. Choosing a theme is essential since it will help you focus your attention on the subject and the overall theme of the image. In addition, it will help you choose the right compositions. If you want to convey a message, you might choose a natural scene or a scene that depicts man’s connection with nature. There are many different ways to approach double exposure photography, and it is best to start with the visual aspect of the image.
Camera settings
The first step in making a double-exposure photograph is to choose the correct camera settings. Using a long shutter speed will allow you to capture as many movements in one picture as possible. This will allow you to stitch together all the movements in one image. The second step is to choose a second photo. Selecting the right one for the double exposure is important as the second shot will impact the first. Then, choose a base picture from your memory card and align the two shots.
Not all digital cameras can shoot a double exposure. Some models have a built-in feature to do this, and you can access it through the camera’s menu system. If you use a Nikon DSLR camera, you can find instructions on how to set the camera’s menu for multiple exposures in the manual. Once you find this setting, you can choose the settings to create your double exposures. This can be tricky to do, but it is not impossible.
Double exposure is a creative storytelling tool. It can capture elements that are hidden in the scene or provide context to a scene. True Detective’s motion graphics artist talks about the use of double exposure in the movie. In cinema, double exposure has been used to convey many emotions, especially in Alfred Hitchcock’s Psycho. CGI is used in many movies, but there are still ways to use double exposure to enhance the scenes.
The first step in a double-exposure photograph is choosing a theme for your images. This step is important, as attempting too complex a shot can discourage you. The idea is to challenge yourself. Many double-exposure photographers choose to shoot silhouettes. This great challenge will allow you to explore your creative side. The second step is to choose the camera settings that allow you to take two photos of the same subject. For some, the double exposure can be a difficult process.
Post-production
A double-exposure photo can be an excellent choice if you want to create an image with more depth and contrast. This style of photography can be done with either film or digital cameras. To create double exposure, you should first compose your shot. By doing so, you’ll be able to make the most of the two photos. Klokow’s video tutorial is a great place to start if you’re unsure how to do this.
Double-exposure photos are often more striking when edited post-production. To do this, you can use Lightroom or Photoshop to merge two photos into one. This will allow you to incorporate new colors and merge the images more pleasingly. Double-exposure photography is easy to achieve with digital cameras and editing software. To take advantage of this technique, learn to use Photoshop. It’s free and will make your photos look better than ever!
The first step in creating a double-exposure photo is to choose a subject. You can choose free stock photos or create one manually. When choosing a base photo, be sure to choose one that features good shadows and highlights. It should also be on a neutral background so that the editing process will be as easy as possible. However, if you’d prefer to create your double-exposure photograph, you can create a unique composition with double exposure.
A second important step in creating a double-exposure image is adding a title. This text will sit above the double-exposure shot. You can change the title’s font and size with the Inspector’s help. This step will make the double-exposure image cleaner and more appealing. It’s also a great way to add interest to your double-exposure photo. Then, you can edit the double-exposure image with Photoshop to create a stunning double-exposure picture.
Examples of double exposures
There are many ways to combine two photos to make a double exposure. For example, you could superimpose one image over the other or take an image with a tripod over a part of the city. A double-exposure photo can be taken in any color, from black and white to all city colors. And don’t forget to experiment with different techniques! Below are some examples of double exposure photography. To create your double-exposure photo, just remember these basic steps:
First, you’ll need to decide how to shoot the images. The best way to do this is to use a tripod. Otherwise, you’ll be risking a blurred or distorted image. Another way to make a double exposure is to use the same camera and lens for both images. This will give you more control over exposure time, but be sure to be prepared to experiment with different settings. Double exposure photography is also popular in other media, including paintings and videos.
Many photographers use multiple exposures to enhance their portraits and landscapes. Although portraiture is the most common application for double exposures, urban scenery is just as interesting. For instance, German photographer Florian Imgrund uses multiple exposures to capture nature scenes and self-portraits. And he also uses multiple images to make a more abstract image. If you’d like to see more double-exposure photography, try looking at his work in the Double Vision series.
You can find plenty of double-exposure examples online. Choose a double-exposure image encompassing more than half of your lens. A successful double exposure image will have a recognizable shape that matches your subject. If you’re feeling brave, you can even post your double exposure to art forums to get constructive feedback from other photographers. You can consult a professional if you’re unsure about a particular technique.